How to
- How to configure wide-screen resolution on Magic Camera.
- How to send sound along with video.
- How to do a live screen streaming or video forwarding.
- How to save video conversation with Magic Camera.
![]() How to configure wide-screen resolution on Magic Camera.
How to configure wide-screen resolution on Magic Camera.
"I have an interesting problem. I have an HD camera that supports 1280 * 720p input. In magic camera version 6.8, under the camera settings, there is no problem as these are all the resolutions supported by my camera (webcam page -> configure button -> configure webcam pin, see picture 1).
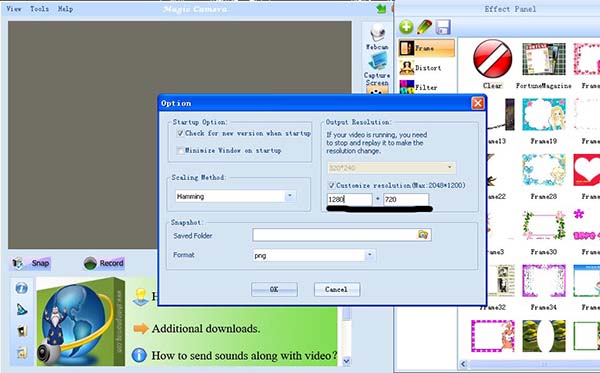
However, when you set the output resolution for the overall settings in magic camera 6.8, there are NO wide screen formats (tools menu -> option dialog -> output resolution settings, see picture 2).
The non-traditional 'wide screen' is 1280 * 800, which is standard computer screen 16:10, NOT industry video 16:9.
I'm not sure what to do because no matter how I view video, it's always skewed."
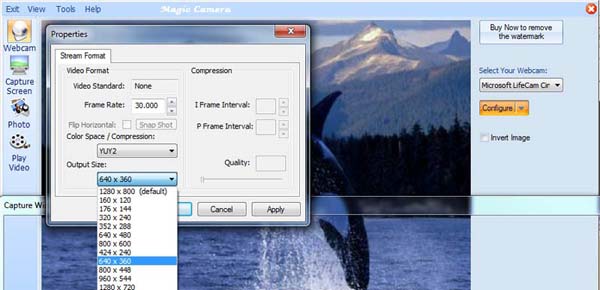

Please upgrade your Magic Camera to version 7.1. With version 7.1 or later, you can choose any resolution you like. So it will be no problem for wide screen resolution or even those non-traditional resolutions. See the screenshot below on how to configure a wide-screen resolution to avoid any black bands or distortions on the webcam video.
![]() How to send
sound along with video.
How to send
sound along with video.
First of all, the simplest way to send sound along with video in Magic Camera is to use our 'Virtual Audio Streaming' software. And, if you use Vista or Windows 7, this maybe the only way to send sound properly because Vista/Win7 has removed the 'Stereo Mix' feature.
However, in WinXP, you may use 'Stereo Mix' to broadcast sound. See below for details:
Almost all of the IM applications only read audio input from
Microphone. So stereo mix has to be enabled if you want to
send movie audios:
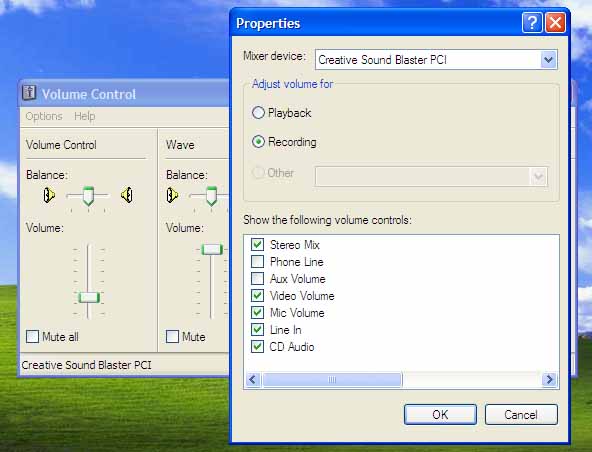
1. Open Volume Control dialog, select Options menu,
and then click
Properties.
2. Check the "Recording" and "Stereo Mix" buttons, then click OK button. See screenshot below.
3. In the popup dialog, check the 'Select' checkbox under the "Stereo Mix" item.
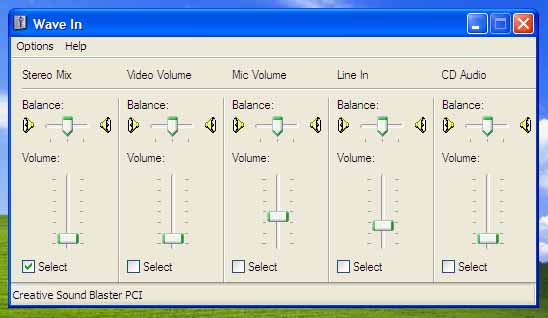
Done. Now your IM applications will send sound along with video.
![]() How to do a
live screen streaming or video forwarding.
How to do a
live screen streaming or video forwarding.
Let's take MSN Messenger as an example. Assume you open two video chat windows called A and B in messenger. You want to forward friend B's video to friend A. So you can take the following steps:
1. Run Magic Camera and switch to Capture Screen Panel.
2. Click "Play" button and move the capture window to friend B's video window on the screen.
3. In friend A's video window, select Magic Camera as your camera source. Now you can send video to A which is live captured form B.
Screenshot:

With the same method, you can also send back your friend's webcam video in real-time. You friend will be amazed by this magic mirror and all the possible cool webcam video effects.
Screenshot:

![]() How to save
video conversation with Magic Camera.
How to save
video conversation with Magic Camera.
NOTE:
This section only applied for old version of Magic
Camera. User can click 'record' button to save videos at any
time after version 6.0.0 of Magic Camera.
To save your own webcam video:
Take the following steps:
1. Switch to Capture Camera Panel or any other panel you want to save your video.
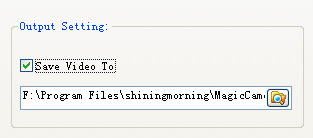
2. Make sure you select the "Save Video To" checkbox.
3. Make sure the path for saving is correct and disk space is enough. See below:
4. Now click playing button. And the played frames will be saved in bitmaps automatically.
5. When you stop playing, the recording will also be stopped.
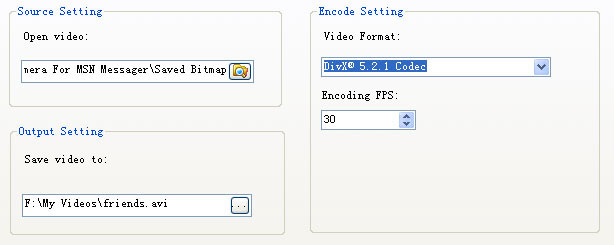
6. Then you can go to the Encode Page to make the video file.
7. Set encoding parameters. Below gives an example:
A few notes:
- The source path is the saving path in the playing/capturing page.
- The available encoding formats depend on how many codecs you have installed on windows.
- The output video files can be either avi or asf format.
8. Click the "start encode" button.
TIPS: You
can also add video effects to the video clip.
To save your friend's living video:
Very similar to the above, you can take the following steps:
1. Switch to Capture Screen Panel.
2. Make sure you have selected "Save Video To" checkbox.
3. Make sure the path for saving is correct and disk space is enough.
4. Move the capturing window to select your friend's video window (for example, MSN Messenger chat window).
5. Start capturing, then the captured bitmaps will be saved automatically.
6. When stopping capturing, the recording also stops.
7. Go to Encode Page to make the video file.